
WordPress is Free and Open-Source Content Management System. It is based on PHP, MySQL, and MariaDB database. More than 30% of websites use WordPress. The reason is, Websites are easier to create with WordPress.
It is not necessary to install WordPress with Quick install. I prefer it to install it manually because we can give database name as we prefer in quick install it take random characters as a database name.
This article will fully guide you on how to install WordPress manually. Let’s get started.
Step 1: Download WordPress
- Download WordPress to your local computer from https://wordpress.org/download/
- Unzip that downloaded .zip or .tar file to a folder.
Step 2: Upload WordPress Files To Web Hosting Account.
Upload WordPress files to your public_html folder in Web Hosting. You can upload files by two ways.
- By using FTP (File Transfer Protocol) services
- By using File Manager upload option given in your Web Hosting Panel.
Step 3: Create MySQL Database and MySQL User.
- Login to your Web Hosting Control Panel (ex. CPanel, CyberPanel, etc) given by your Hosting Provider.
- Go to Database Section and click on Create Database OR MySQL Database Wizard.
- Now add MySQL User, Database name, and Password you want to create.
- Click the All Privileges checkbox and click Next.
- Note MySQL User, Database name, and Password it will required when we install WordPress.
Step 4: Run The Installation
Open a web browser and go to the installation page to run the installation script. Run the following URL in the browser.
http://example.com/wp-admin/install.phpReplace example.com to your domain name.
Not it will open the installation page. Select your preferred language. Installer asks you to create a configuration file and click on Create configuration file.
Step 5: Fill MySQL Details.
After this install will tell you to enter the MySQL username, Database name, and password so that WordPress can connect to the database.
This is the time to fill the inputs with our MySQL details which we noted on Step 3.
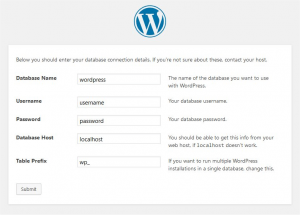
Add database host as localhost if your database is located on the same web server. Otherwise, add the database server IP address. Click Submit.
Step 6: Complete The Installation Process.
Now it will ask you to enter Site Title, Username, Password, Email which will be used to login to your website’s admin dashboard.
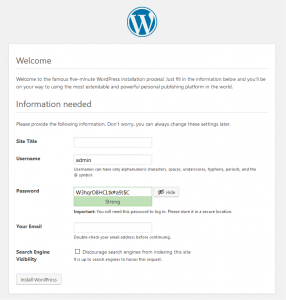
After filling this up click on Install Wordpress. You’re done now WordPress is now successfully installed.
Now it will show “Success! WordPress has been installed”.