
Migrating your WordPress site to different hosting is a Painless Process. You just need to follow some easy steps to complete your WordPress migration successfully. However, some steps when not done right could provoke several problems that cause trouble and lead to unsuccessful site transfers.
Let’s go through the steps required to move your WordPress site to a new host. Before getting started keep in mind that many hosting providers offer free website migration if you purchase their hosting plan. So look for hosting that offers free migration.
Step 1: Backup Your Website Files
The very first expect is to backup all files of your website. If you miss a single file to backup that will a huge threat to your website.
So how you can backup your site? There are many WordPress plugins that you can use to backup your WordPress website. Most of the plugin can provide you the backup file of your WordPress free. But when you try to import that WordPress backup using that plugin it will ask you to buy their premium subscription xD.
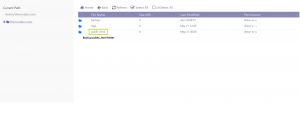
The Best and easy way to backup your website free is by doing it manually. You need to log in to your CPanel or any other web hosting control panel. Almost all hosting panels provide the facility of zipping any folder/files you want. I recommend zipping your whole public_html folder. You can down that zip backup by using FTP services or by file manager present in the hosting panel.
Step 2: Export your WordPress Database
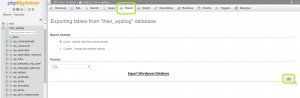
Exporting your WordPress is a simple process. Log in to your web hosting control panel and open the phpMyAdmin. select the database that contains your WordPress installation from the list on the left sidebar. After selecting database click on the Export tab.
Select the Export Method as Quick and select SQL as a format. Click on Go button and .sql file will be downloaded to your computer.
Once you download Database and files backup successfully, you are ready to migrate your site to another hosting.
Step 3: Upload WordPress files to your new hosting
Connect to your new host by using FTP (Filezilla) and browse the folder where your website files should go (i.e public_html). Upload your files backup to the public_html folder of the new host.
After the successful completion of files transfer, you can now move to another step.
Step 4: Create a database in your new hosting.
Log in to your web hosting control panel of new hosting. Create a new database. This database will contain your WordPress installation data.
The steps to create a database are quite simple:
- Open MySQL Database and create a new database.
- Create a new MySQL user.
- Set Secure Password to MySQL user.
- Add this user account to the new database and grant it All Privileges.
Note down the database name, new MySQL username, and its password.
Step 5: Import the WordPress database.
After creating a new database, MySQL user to a new host, you need to import your old WordPress database that you downloaded from the old host’s phpMyAdmin.
To Import database login to the new database in phpMyAdmin of new host. Select the database from the left sidebar and click on Import tab from navigation menu.
In the File to Import section click choose file button and select SQL file that you exported previously on your computer.
Un-tick the partial import checkbox, make sure the format is set to SQL and then click the Go button. The database import will now begin.
You will get a Success message on the screen after the database import successfully complete.
Step 6: Edit wp-config.php file
Browse to the folder where your website file ins installed i.e public_html folder. In this folder, there is one file named wp-config.php which controls website connection to MySQL database. Edit this file in the editor.
We need to edit few lines in this wp-config.php file
1. Change the database name.
Locate the following line in this file:
define('DB_NAME', '<strong>db_name</strong>');The ‘db_name‘ portion of this line will currently be set to the MySQL database name of your old web host. This must be changed to the name of the new database you have just created.
2. Change the database username.
Find the line:
define('DB_USER', '<strong>db_user</strong>');In this line change the ‘db_user‘ from the username of the old host to the new username you have just created.
3. Change the database user password.
Edit the line:
define('DB_PASSWORD', '<strong>db_pass</strong>');Change the ‘db_pass‘ line to the new secure password you created for your MySQL user.
Save and close the wp-config.php. Now your migration is completed but to make your website live from the new host you need to follow Step 7.
Step 7: Change Domain Nameserver.
This is the last step to complete your WordPress migration. If you want to make your website live from your new host then you need to update your domain’s nameserver to new nameserver given by your new host.
To change nameserver of your domain you need to go to settings of DNS management or Nameserver tab of your domain provider. find update nameserver option and replace your current nameserver with your new host nameserver.
After updating nameserver it may take 24 hours to successfully propagate your website to a new host. During these 24 hours do not update your website as it may update changes to the old host and after propagation it will not reflect on your new hosting.